From the Cloud to Your Screen: Building a Weather Monitoring System with ESP32 and ThingSpeak
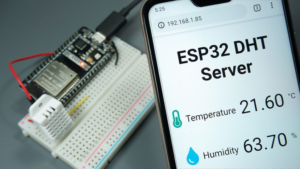
The “From the Cloud to Your Screen” project attempts to create a reasonably priced weather monitoring system utilising the ESP32 and Thingspeak. Users will receive precise and easily available weather information from the system, which will collect and display real-time weather data from sensors.

Let’s understand the components and software first. :
- ESP32 : ESP32 is a microcontroller developed by Espressif Systems.With Wi-Fi and Bluetooth connectivity built in, it is a low-power, highly integrated gadget that is perfect for Internet of Things applications. A dual-core processor, plenty of memory and storage, and a selection of peripherals for sensors, displays, and other devices are all features of the ESP32. A wide range of programming languages and development environments are supported by the microcontroller, making it simple for programmers to make unique applications for various tasks. Due to its adaptability and capabilities, ESP32 is a well-liked option for projects ranging from wearable technology to home automation systems.
Difference Between ESP32 And ESP 8266 : Espressif Systems created both the ESP32 and ESP8266 microcontrollers, although there are some significant differences between them:
- Processing power: In comparison to the ESP8266, the ESP32 boasts a dual-core processor. This indicates that the ESP32 can analyse more data and handle more complicated tasks than the ESP8266.
- Memory: The ESP32 is better suited for applications that call for greater memory because it has more RAM, flash memory, and PSRAM than the ESP8266.
- Wi-Fi and Bluetooth are supported by ESP32 and ESP8266, respectively, in terms of connectivity. This indicates that the ESP32 can be applied to projects that need Bluetooth and Wi-Fi connectivity.
- Power Usage: ESP32 is intended to use less energy than ESP8266. For battery-powered applications that must run for extended periods of time, this makes it a superior option.
- Cost-sensitive projects should consider using ESP8266 because it is typically less expensive than ESP32.
In conclusion, ESP32 is a more capable and flexible microcontroller than ESP8266, featuring a dual-core processor, additional memory and storage, as well as connection for both Wi-Fi and Bluetooth. However, compared to the ESP8266, it is also more expensive and consumes more power. The project’s unique requirements and limits will determine which option is best.
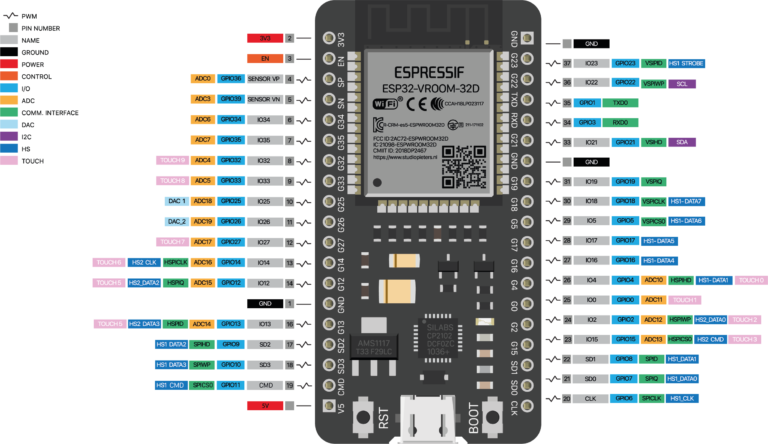
2.Pin Configuration:

- DHT11 sensor : The DHT11 sensor is a low-cost, digital temperature and humidity sensor that can be used in weather monitoring systems. It provides accurate readings and is easy to use with the ESP32 microcontroller and ThingSpeak platform. To use the DHT11 in a weather monitoring system, you will need to connect it to the ESP32, write code to collect data, and send it to ThingSpeak for visualisation and analysis. The DHT11 is a reliable option for building a weather monitoring system with ESP32 and ThingSpeak.
- Thingspeak : ThingSpeak is an open-source IoT platform that enables users to gather, store, examine, and visualise sensor data in the cloud. It supports a variety of programming languages and development environments and provides real-time data streaming, visualisation, and analysis tools.
It is frequently employed in IoT applications like home automation, weather monitoring, energy management, and others.
For more Details visit : https://youtu.be/WeiUMwUB1pA
Set up stages for this project
Step 1 : Create a free ThingSpeak.com account.
- The “New Channel” button can be found by selecting the “Channels” tab.
- Enter the information for your channel, including the name, a brief description, and the field names for the information you’ll be gathering.
- If necessary, change your channel’s privacy settings.
- Keep your channel open.
- You must get the API key to use for sending data to your channel after you’ve built it. To get your API key:
- Select “API Keys” from the tabs.
- When sending data to the channel, copy the “Write API Key” and insert it into your program’s code or application.
- Keep in mind that since your API key grants write access to your channel, it is crucial to keep it private and safe. It is advised to communicate data securely and to routinely change your API key for security reasons.
You can send data to your ThingSpeak channel and view it in real time on the ThingSpeak website by using the API key. You can also use the data for analysis and visualisation in other platforms and programmes.
Step 2 : Setup Arduino IDE to use ESP32 Board:
Installing the ESP32 board support package in the Arduino IDE is required to configure the Arduino IDE to work with an ESP32 board. This is how:
- Select “Preferences” from the “File” menu after launching the Arduino IDE.
- Enter the following URL for the ESP32 board support package in the “Additional Boards Manager URLs” field: https://dl.espressif.com/dl/package esp32 index.json
- Pick “Board:” and “Boards Manager” from the “Tools” menu.
- Find “ESP32” in the Boards Manager and select the “ESP32 by Espressif Systems” package.
- The “Install” button must be clicked in order to install the ESP32 board support package.
- Close the Boards Manager after the installation is finished, then choose “ESP32 Dev Module” from the “Tools > Board” menu.
- Utilise a micro-USB cable to connect your ESP32 board to your PC.
- In the “Tools > Port” menu, pick the proper serial port for your ESP32 board.
- You are now prepared to use the Arduino IDE to upload sketches to your ESP32 device.
Note: Depending on your operating system, you might also need to install the USB drivers for your ESP32 board. For installation instructions, consult the manufacturer’s website.
Step 3 ( Code ) :
					 #include <WiFi.h>

#include <WiFiMulti.h>

#include "DHT.h"

#define DHTPIN 2

#define DHTTYPE DHT11

DHT dht(DHTPIN, DHTTYPE);


WiFiMulti WiFiMulti;

const char* ssid     = "Amplifiers"; // Your SSID (Name of your WiFi)

const char* password = "Ak*****"; //Your Wifi password

const char* host = "api.thingspeak.com";

String api_key = "F3UD*********T5L7"; // Your API Key provied by thingspeak

void setup(){

  Serial.begin(9600);

   Serial.println(F("DHTxx test!"));

  dht.begin();

  Connect_to_Wifi();

}

void loop(){

   float h = dht.readHumidity();

  float t = dht.readTemperature();

  float f = dht.readTemperature(true);

  if (isnan(h) || isnan(t) || isnan(f)) {

    Serial.println(F("Failed to read from DHT sensor!"));

    return;

  }

   Serial.print(F("Humidity: "));

  Serial.print(h);

  Serial.print(F("%  Temperature: "));

  Serial.print(t);

  Serial.println(F("°C "));


 // call function to send data to Thingspeak

  Send_Data(t,h);

  delay(5000);


}

void Connect_to_Wifi()

{

  // We start by connecting to a WiFi network

  WiFiMulti.addAP(ssid, password);

  Serial.println();

  Serial.println();

  Serial.print("Wait for WiFi... ");

  while (WiFiMulti.run() != WL_CONNECTED) {

    Serial.print(".");

    delay(500);

  }

  Serial.println("");

  Serial.println("WiFi connected");

  Serial.println("IP address: ");

  Serial.println(WiFi.localIP());

}

void Send_Data(float t, float h)

{

  // map the moist to 0 and 100% for a nice overview in thingspeak.

  Serial.println("");

  Serial.println("Prepare to send data");

  // Use WiFiClient class to create TCP connections

  WiFiClient client;

  const int httpPort = 80;

  if (!client.connect(host, httpPort)) {

    Serial.println("connection failed");

    return;

  }

  else

  {

    String data_to_send = api_key;

    data_to_send += "&field1=";

    data_to_send += String(t);

    data_to_send += "&field2=";

    data_to_send += String(h);

    // data_to_send += "&field3=";

    // data_to_send += String(pressure);

    data_to_send += "\r\n\r\n";

    client.print("POST /update HTTP/1.1\n");

    client.print("Host: api.thingspeak.com\n");

    client.print("Connection: close\n");

    client.print("X-THINGSPEAKAPIKEY: " + api_key + "\n");

    client.print("Content-Type: application/x-www-form-urlencoded\n");

    client.print("Content-Length: ");

    client.print(data_to_send.length());

    client.print("\n\n");

    client.print(data_to_send);

    delay(1000);

  }

  client.stop();

}
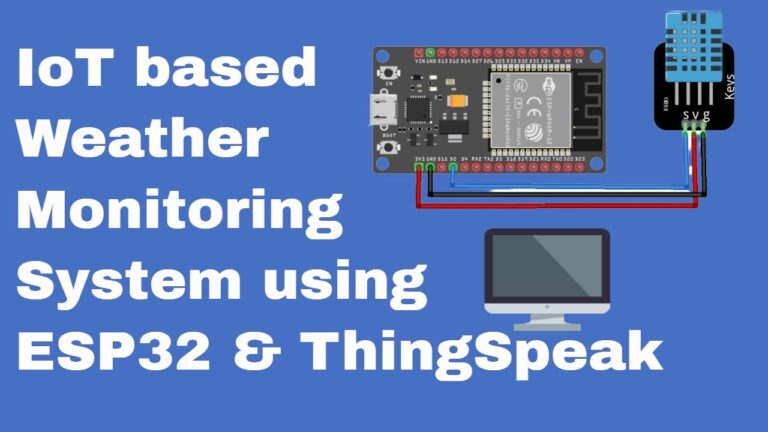
Step 4 ( Constructing a Circuit) :
- Insert the ESP32 into the breadboard.
- Connect the GND pin on the ESP32 to the negative rail of the breadboard.
- Connect the 3.3V pin on the ESP32 to the positive rail of the breadboard.
- VCC to 3.3V, GND to GND, data to pin 2.
- Connect ESP32 to breadboard: insert ESP32, connect GND to negative rail, 3.3V to positive rail.
- Connect power supply: positive wire to positive rail, negative wire to negative rail.
- Upload code to ESP32: connect ESP32 to computer, install software, write code, upload code.
This will collect temperature and humidity data from the DHT11 and send it to ThingSpeak for display and analysis.
In conclusion, ESP32 and ThingSpeak combine to create a reliable system for weather monitoring. The hardware is provided by ESP32, while the cloud-based platform for storage, analysis, and visualisation is offered by ThingSpeak.
Click the image below to learn more.


Pingback: How to Add Library in Arduino IDE in 5 Minutes – A Powerful Step-by-Step Guide for Beginners
Pingback: How to Add ESP8266 ESP32 to Arduino IDE: A Powerful Step-by-Step Guide for Beginners