
How to Set Up Your Organization Email in Gmail on Android: A Step-by-Step Guide
In this blog post, you’ll learn how to set up your business email on Gmail for Android devices using Hostinger’s email hosting service. Follow our step-by-step guide to easily configure your email settings and access your business emails through the familiar Gmail interface.
If you’re like most people, you probably have more than one email account. Luckily, setting up a secondary Gmail account on your Android device is a breeze. In this blog post, we’ll guide you through the process.
Step 1: Make sure you have the latest version of Gmail.
Before you proceed with adding a secondary Gmail account, ensure you are using the latest version of the app. To do this, follow these simple steps:
- Open the Google Play Store on your Android device.
- Type “Gmail” in the search bar, then click “Update.”
- If you don’t see an “Update” button, it means you already have the latest version of the app.
Step 2: Adding a Business Gmail Account
Now that you have the latest version of Gmail, you can proceed to add a secondary account. Here’s how to do it:
- Open the Gmail app on your Android device.
- Tap on the Google Account icon located in the top-right corner of the screen.
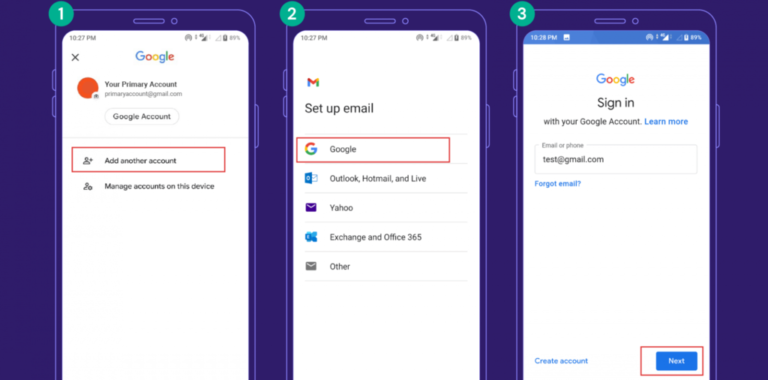
- Select “Add another account.”
- On the “Set up email” screen, choose “Google.”
- Enter the email address of your secondary Gmail account in the “Sign in” field, then tap “Next.”
- Enter your password, then tap “Next” again.
- Google will ask if you want to add a phone number for additional security. We recommend opting in. Tap the “Yes, I’m in” button.
- You’ll then see the Google Terms of Service screen. Select “I agree.”
Step 3. Finding Your Email Settings
- Finding the email account details is the first step in configuring your email on an Android device.
- These can be found on your hPanel dashboard if your company uses Hostinger for email hosting.
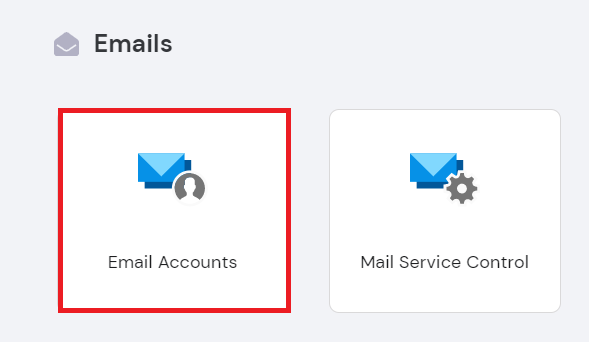
- Open your Hostinger account and log in. Go to Emails -> Email Accounts after that.
- Choose Configuration settings from the left navigation pane.
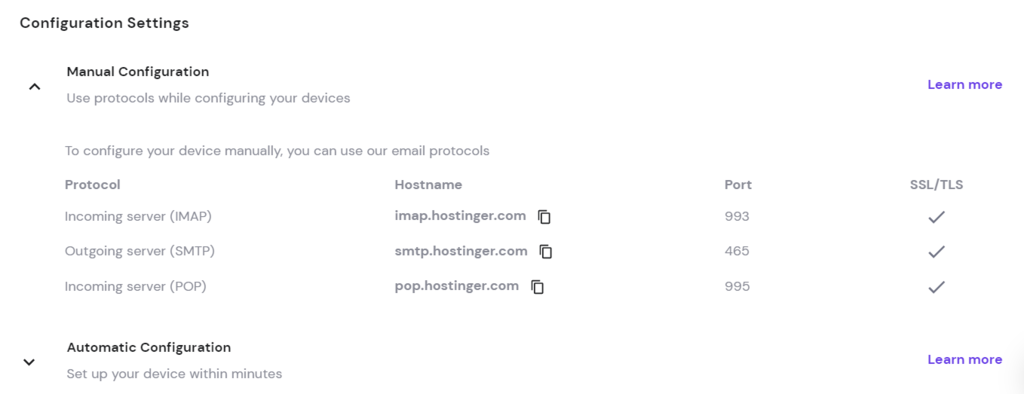
- Locate the Manual Configuration dropdown menu in the Configuration Settings section. It contains the email protocols IMAP, SMTP, and POP.
- Because you’ll need them later, make a note of the protocol name, hostname, and port.
- Build a custom email address if you don’t already have one by selecting Add email account in the Create new email account section.
- By entering an email name in the provided field, you can create a new email account. Make a password, then press the Create button.
Step 4. Configuring Outgoing Server Settings
- To get started, open the Gmail app and tap on the menu icon in the upper-left corner of the screen. From there, select Settings and tap Add account.
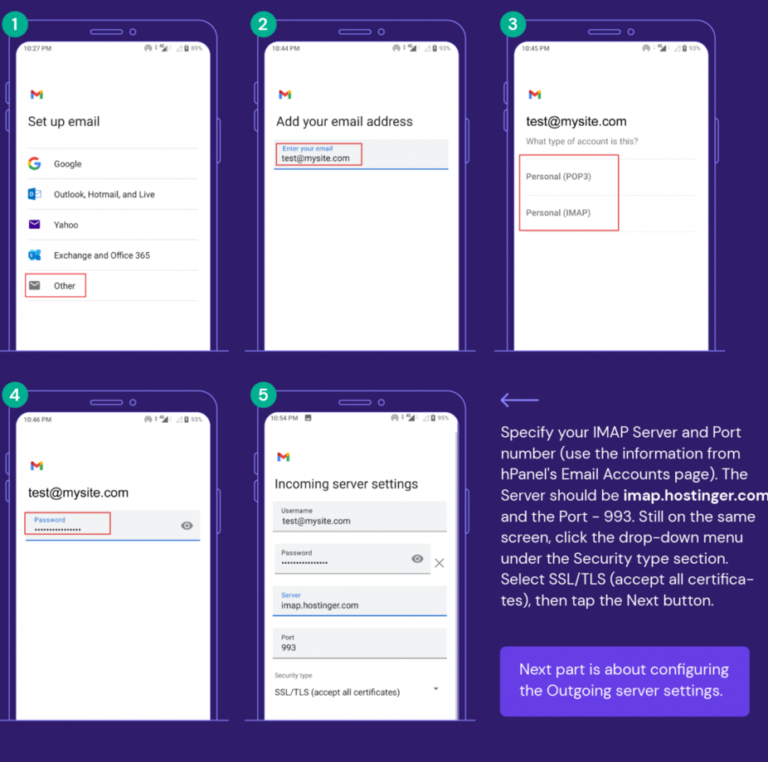
- On the Set up email window, select Other since we’re setting up a custom email account. Enter your full email address and tap Manual Setup.
- Choose IMAP as your email protocol to synchronise your email inbox across multiple devices. Fill in your password and tap Next.
- Next, configure the incoming server settings by specifying your IMAP server and port number, which can be found on hPanel’s Email Accounts page. Use imap.hostinger.com as your server and Port 993.
- Under the Security Type section, select SSL/TLS (accept all certificates) and tap Next.
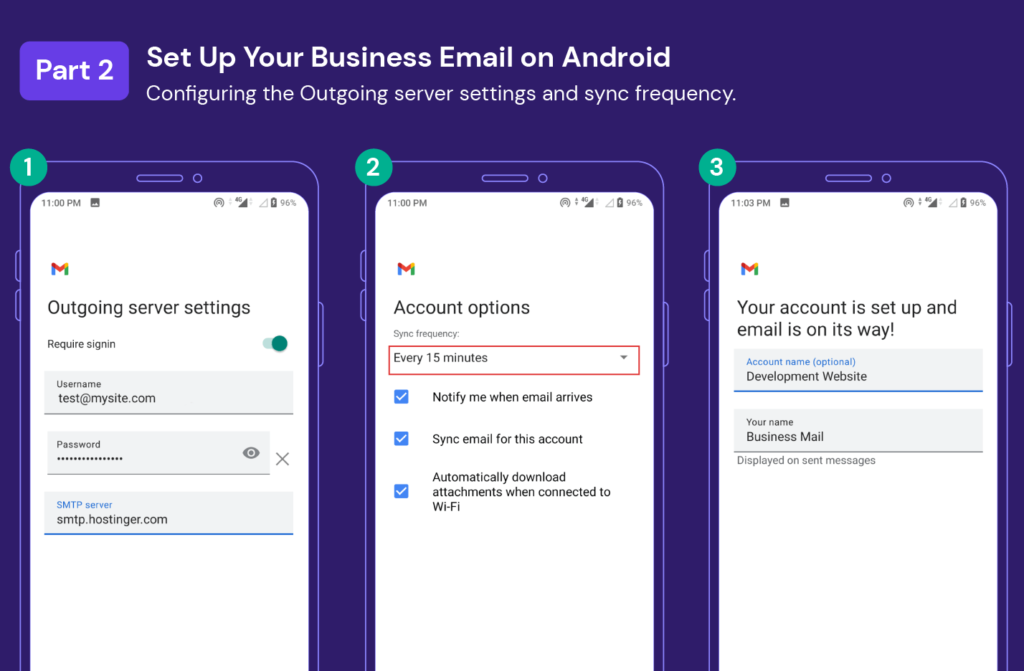
- Now, it’s time to configure the incoming server settings.
- Both the username and password fields will be automatically filled in with your full email address and password.
- Enter smtp.hostinger.com into the SMTP Server field and tap Next.
- On the Account options screen, set up the sync frequency and any additional preferences, such as sync email, for this account. Tap Next.
- Lastly, type in your name as the display name on messages you send from this account. You can also set an account name, but it’s not mandatory. Tap Next to finish the process.
- In conclusion, setting up a new email account on your Android device is a breeze with these simple steps. Happy emailing!
You’ve successfully installed a custom email account to your Android device, so congrats.