
How to Add ESP8266 ESP32 to Arduino IDE: A Powerful Step-by-Step Guide for Beginners
The ESP8266 and ESP32 boards have completely transformed the way we build Internet of Things (IoT) projects. Known for their affordability and built-in Wi-Fi capabilities, these boards are now a top choice for developers, students, and hobbyists around the world.
But before you can start building with these powerful modules, you must first add ESP8266 ESP32 to Arduino IDE. In this detailed guide, you’ll learn how to add ESP8266/ESP32 board in Arduino IDE step-by-step. We’ll cover both ESP8266 setup Arduino IDE and ESP32 setup Arduino IDE so you can easily get started with either board.
🚀 Why Use ESP8266 and ESP32 Boards?
Both ESP8266 and ESP32 microcontrollers are incredibly popular because they offer:
Built-in Wi-Fi and Bluetooth connectivity
Low cost with powerful processing capabilities
Easy integration with Arduino IDE
Perfect for IoT, home automation, and smart devices
Whether you’re looking to build wireless sensors, home automation systems, or cloud-connected devices, these boards are the ideal choice.
But first, you need to install ESP8266 board in Arduino IDE or install ESP32 board in Arduino IDE to start programming them.
🛠️ How to Add ESP8266 ESP32 to Arduino IDE: Quick Overview
The Arduino IDE doesn’t support ESP8266 or ESP32 boards by default. You’ll need to install additional board definitions using the Boards Manager URL.
Here’s what you’ll learn in this guide:
How to add ESP8266 board to Arduino IDE
How to add ESP32 board to Arduino IDE
How to properly set up the boards and libraries
Troubleshooting tips for ESP setup
✅ How to Install ESP8266 Board in Arduino IDE
Follow these simple steps to install ESP8266 board in Arduino IDE:
Step 1: Open Arduino IDE
Launch your Arduino IDE on your computer. Make sure you’re using version 1.8.0 or higher for compatibility.
Step 2: Add ESP8266 Board URL
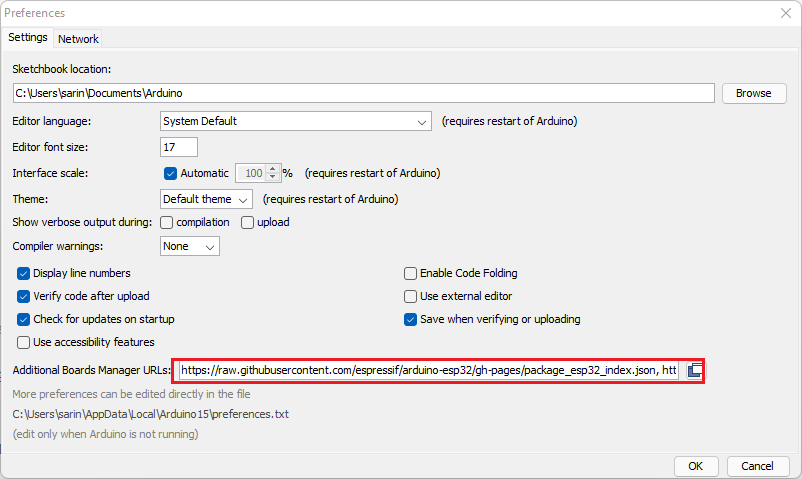
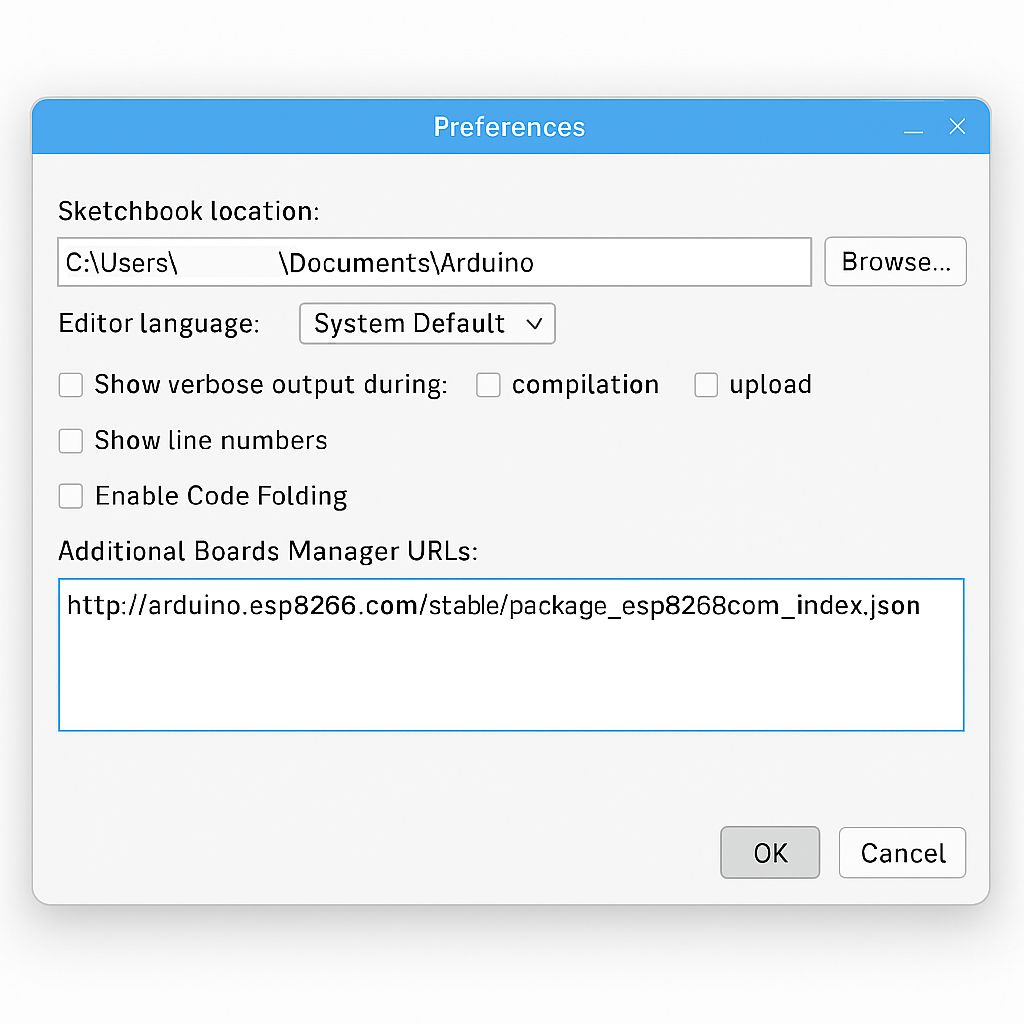
Go to File → Preferences.
In the Additional Boards Manager URLs field, paste the following URL:
http://arduino.esp8266.com/stable/package_esp8266com_index.json
If you already have another URL listed, separate them with a comma.
Step 3: Open Boards Manager
Navigate to Tools → Board → Boards Manager.
Search for ESP8266 in the search bar.
Step 4: Install ESP8266 Platform
Click Install on the “esp8266 by ESP8266 Community” option.
Wait for the download to complete.
Step 5: Select ESP8266 Board
Once installed, go to Tools → Board and select your ESP8266 model (for example, NodeMCU 1.0 or Wemos D1 Mini.
✅ How to Install ESP32 Board in Arduino IDE
The ESP32 setup is very similar to the ESP8266 setup. Here’s how you can install ESP32 board in Arduino IDE step-by-step:
Step 1: Open Arduino IDE Preferences
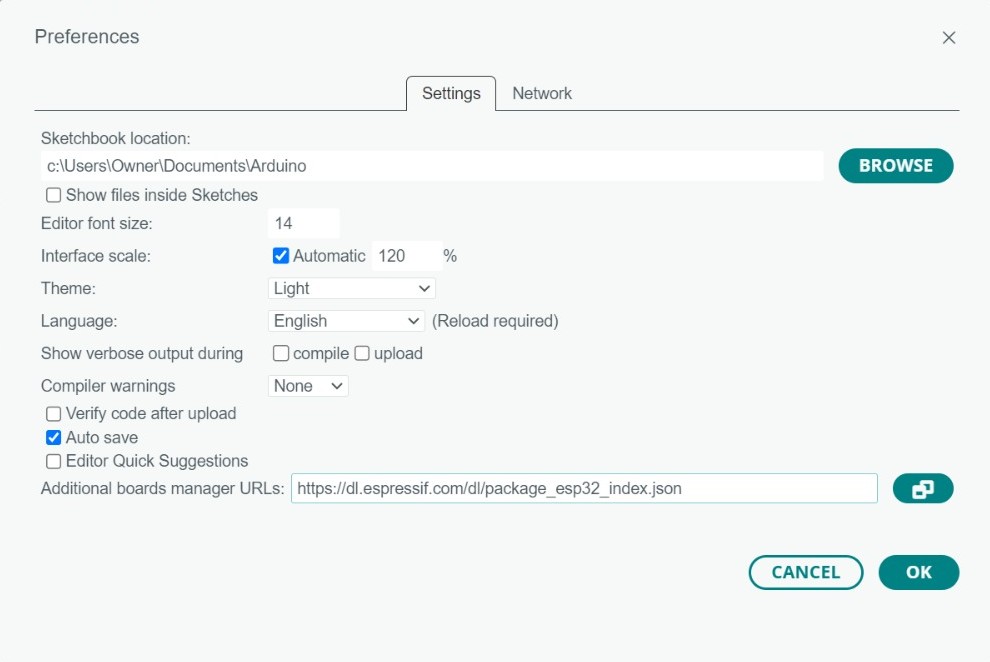
Go to File → Preferences in the Arduino IDE.
Step 2: Add ESP32 Board URL
In the Additional Boards Manager URLs field, add this URL:
https://dl.espressif.com/dl/package_esp32_index.json
If you have multiple URLs, separate them with commas.
Step 3: Launch Boards Manager
Go to Tools → Board → Boards Manager.
Search for ESP32 in the search bar.
Step 4: Install ESP32 Platform
Click Install on the “esp32 by Espressif Systems” option.
This will download all necessary files for ESP32 setup in Arduino IDE.
Step 5: Select Your ESP32 Board
After installation, go to Tools → Board and select your ESP32 model (for example, ESP32 Dev Module or Node32S).
⚙️ ESP8266 Setup Arduino IDE: Additional Settings
Once you’ve installed the ESP8266 board, configure the following:
Port: Select the correct COM port for your device.
Upload Speed: Default 115200 works in most cases.
CPU Frequency: 80 MHz or 160 MHz depending on your board.
Flash Size: Usually 4MB for most ESP8266 boards.
These settings ensure your sketches upload correctly to the board.
⚙️ ESP32 Setup Arduino IDE: Additional Settings
For ESP32, configure the following settings:
Port: Make sure to select the correct COM port.
Flash Frequency: Default 80 MHz.
Upload Speed: 921600 is recommended for faster uploads.
Partition Scheme: Default setting works for most projects.
These configurations are essential for stable communication between your computer and the ESP32 board.
✅ How to Test Your ESP8266/ESP32 Board
Once you’ve completed the setup:
Connect your ESP8266 or ESP32 to your computer via USB.
Open Arduino IDE.
Go to File → Examples → WiFi (ESP32) or ESP8266WiFi → WiFiScan.
Upload the sketch to your board.
Open the Serial Monitor to check if nearby Wi-Fi networks are detected.
If the scan is successful, your ESP8266 setup Arduino IDE or ESP32 setup Arduino IDE is complete!
🚩 Common Troubleshooting Tips
Board Not Found: Double-check that you selected the correct COM port.
Upload Errors: Lower the upload speed if you face communication issues.
Driver Issues: Some boards need a CH340 or CP2102 USB driver. Download from the official manufacturer’s website.
Serial Monitor Not Displaying: Ensure baud rate matches the sketch’s Serial.begin() setting.
🔗 Similar Blogs You Might Like
1. What is an Arduino? A Beginner’s Guide
2. Wireless Raspberry Pi Control – A Complete Guide
3. IoT with ESP32 and ThingSpeak – Real-time Data Logging
4. Arduino void setup() and void loop() Explained
5. Introduction to IoT – Basics and Applications
6. How to Add Library in Arduino IDE – A Step-by-Step Guide