
From Zero to RESTful: A Practical Guide to Django Rest Framework
Django Rest Framework (DRF) is a powerful toolkit for building web APIs that integrate seamlessly with Django. In this guide, we’ll explore the features and capabilities of DRF, from the basics of RESTful APIs to advanced topics like authentication, authorization, and serialization. Whether you’re a seasoned developer or just starting out, this guide will provide you with the knowledge and tools you need to build scalable and secure APIs with DRF. Let’s get started!
Let’s divide the procedure into several steps:
Initial Setup
- To obtain multiple user information while registering for an application, we must follow the steps below:
- We need to create a Django application for that, so we will create a project inside PyCharm and write a command :
pip install django
- The above command will download all of the Django files into a virtual environment. Following that, we must use the command to create a Django project:
django-admin startproject RESTDemo
- We must install this package because we’ll be using the DjangoRest framework.Execute the commands below to install the DjangoRest Framework.
pip install djangorestframework
- Code is organized into applications by Django, which enables you to write code that is also easier to maintain. Run the command listed below to build a restapp that will contain the source code for our application.
python manage.py startapp restapp
Settings.py:
- Once you have created a Django app, the next step is to add it to the project’s settings.py file. Within settings.py, there is a list called INSTALLED_APPS,which contains the names of all the apps installed in the Django project.
- To add your app to this list, simply include the name of the app, followed by rest_framework (which is required for using Django Rest Framework), as shown below:
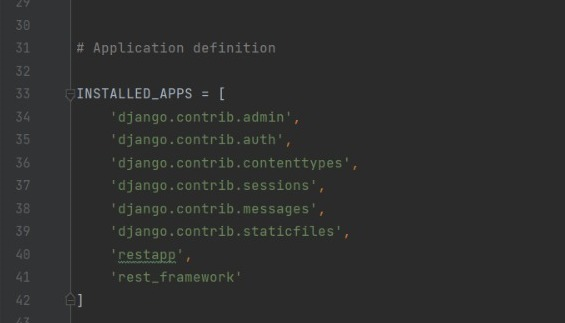
- By adding your app and rest_framework to the INSTALLED_APPS list, you are telling Django to include them in the project and make them available for use. Once you have completed this step, you can begin configuring your app and building your API using the Django Rest Framework.
Models.py:
- To define the structure of your data in a Django app, you need to create a model. A model is a Python class that represents a table in a relational database. To create a model in your restapp, add the following code to the models.py file:
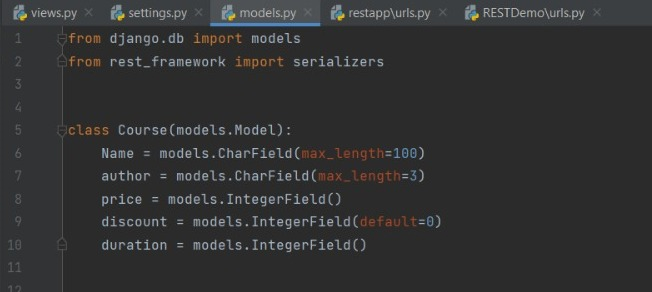
from django.db import models
from rest_framework import serializers


class Course(models.Model):
   Name = models.CharField(max_length=100)
   author = models.CharField(max_length=3)
   price = models.IntegerField()
   discount = models.IntegerField(default=0)
   duration = models.IntegerField()
- We will do migrations after building the model, and to do so, we will issue the following commands:
					python manage.py makemigrations
python manage.py migrate
Django Serializer:
- Python objects in Django are converted to JSON and vice versa using a serializer. A serializer class must be defined in order to generate a serializer.
- The restapp’s models.py file can be modified by adding the following code to do this:
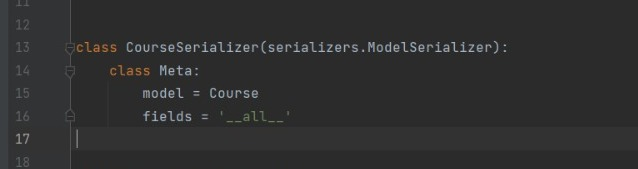
					class CourseSerializer(serializers.ModelSerializer):
   class Meta:
       model = Course
       fields = '__all__'
- By creating a serializer in this way, you can easily convert your model instances to JSON format and vice versa, making it easy to work with your data in a variety of contexts, such as when building APIs with Django Rest Framework.
Django API view :
- The Django API The logic that responds to incoming HTTP requests is stored in the view. Therefore, we must use api view decorators to write all CRUD operations in the views.py file. In the views.py file, we must import our model and serializer to achieve that. Additionally, we update rest framework.decorators with the api view methods.

					from rest_framework import status
from rest_framework.decorators import api_view
from rest_framework.response import Response
from rest_framework.views import APIView

from .models import Course, CourseSerializer

@api_view(['GET'])
def getcourse(request):
   courses = Course.objects.all()
   courseSerializer = CourseSerializer(courses, many=True)
   return Response(courseSerializer.data)


@api_view(['POST'])
def addcourse(request):
   courseserializer = CourseSerializer(data=request.data)
   if courseserializer.is_valid():
       courseserializer.save()
       return Response(courseserializer.data)
   return Response(courseserializer.errors)


@api_view(['GET'])
def getonecourse(request, pk):
   course = Course.objects.get(pk=pk)
   courseserializer = CourseSerializer(course)
   return Response(courseserializer.data)


@api_view(['PUT'])
def updatecourse(request, pk):
   course = Course.objects.get(pk=pk)
   courseserializer = CourseSerializer(course, data=request.data)
   if courseserializer.is_valid():
       courseserializer.save()
   return Response(courseserializer.errors)


@api_view(['DELETE'])
def deletecourse(request, pk):
   course = Course.objects.get(pk=pk)
   course.delete()
   return Response(status=status.HTTP_204_NO_CONTENT)
Django URL:
- In Django, you must offer an API endpoint URL where users can submit requests for data and interact with your application.
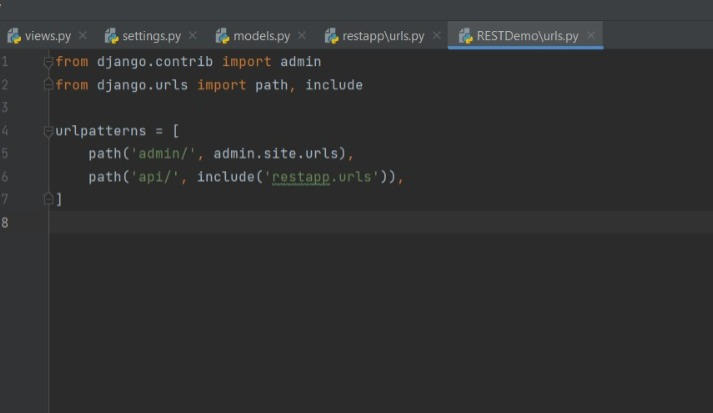
- You must first configure your restapp URLs to use the root project URLs in order to accomplish this. This can be accomplished by including the subsequent code in the urls.py file of the root project:
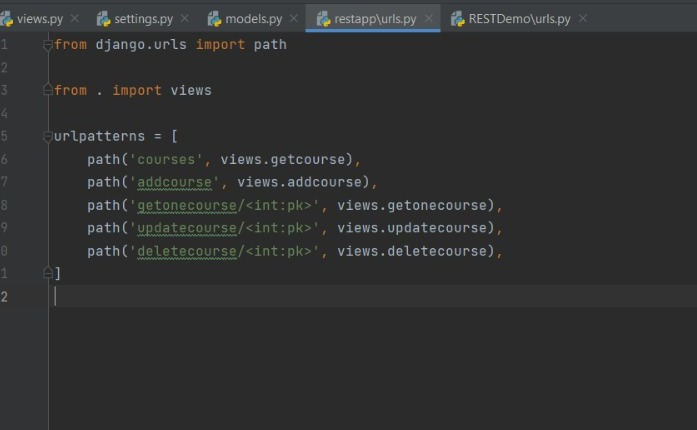
- Then, we add the code—which are request urls—to the restapp and submit the data below.
Root urls.py
from django.contrib import admin
from django.urls import path, include

urlpatterns = [
   path('admin/', admin.site.urls),
   path('api/', include('restapp.urls')),
]


App’s( restapp ) urls.py

from django.contrib import admin
from django.urls import path
from . import views

urlpatterns = [
   path('courses', views.getcourse),
   path('addcourse', views.addcourse),
   path('getonecourse/<int:pk>', views.getonecourse),
   path('updatecourse/<int:pk>', views.updatecourse),
   path('deletecourse/<int:pk>', views.deletecourse),
]
Run Application:
- Now let’s open the application on localhost: http://127.0.0.1:8000/
- To accomplish this, we will execute the following command:
python manage.py runserver
- Following that, we are supposed to add a URL because we want to perform various operations.As given in urls.py, add the url.
.